Nextcloud integration
This app enables users to edit office documents from Nextcloud using ONLYOFFICE Docs.
The latest app signed versions are available in the official store for Nextcloud.
Features
- Currently, the following document formats can be opened and edited with this app: DOCM, DOCX, DOTM, DOTX, PDF, POTM, POTX, PPSM, PPSX, PPTM, PPTX, XLSB, XLSM, XLSX, XLTM, XLTX.
- The following formats are available for viewing only: CSV, DJVU, DOC, DOT, DPS, DPT, EPUB, ET, ETT, FB2, FODP, FODS, FODT, HTM, HTML, HWP, HWPX, KEY, MD, MHT, MHTML, NUMBERS, ODG, ODP, ODS, ODT, OTP, OTS, OTT, OXPS, PAGES, POT, PPS, PPT, RTF, STW, SXC, SXI, SXW, TXT, VSDM, VSDX, VSSM, VSSX, VSTM, VSTX, WPS, WPT, XLS, XLT, XML, XPS.
- The following formats can be converted into OOXML: DOC, DOCM, DOT, DOTX, EPUB, HTM, HTML, ODP, ODT, POT, POTM, POTX, PPS, PPSM, PPSX, PPT, PPTM, RTF, XLS, XLSM, XLT, XLTM, XLTX.
- The app will create an item in the new (+) menu to create Document, Spreadsheet, Presentation, PDF. It will also create a new Open in ONLYOFFICE menu option within the document library for Office documents. This allows multiple users to collaborate in real time and to save back those changes to Nextcloud. Co-editing is also available between several federated Nextcloud instances connected to one Document Server.
Installing ONLYOFFICE Docs
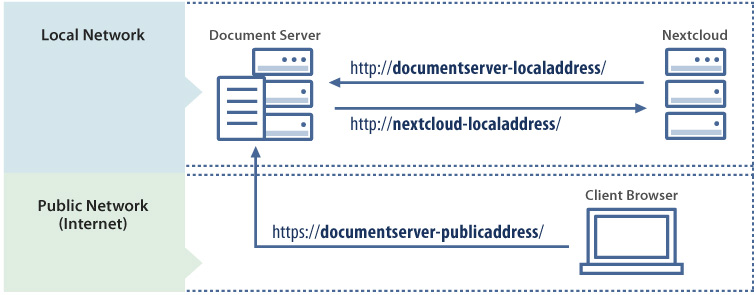
You will need an instance of ONLYOFFICE Docs (Document Server) that is resolvable and connectable both from Nextcloud and any end clients. If that is not the case, use the official ONLYOFFICE Docs documentation page. ONLYOFFICE Docs must also be able to POST to Nextcloud directly.
ONLYOFFICE Docs and Nextcloud can be installed either on different computers, or on the same machine. In case you select the latter variant, you will need to set up a custom port for Document Server as by default both ONLYOFFICE Docs and Nextcloud work on port 80. Or you can use ONLYOFFICE Docs behind a proxy, please refer to this article to learn how you can configure it.
The easiest way to start an instance of ONLYOFFICE Docs is to use Docker.
You can also use our Docker installation to get installed and configured ONLYOFFICE Docs and Nextcloud installation with a couple of commands.
Installing ONLYOFFICE app for Nextcloud
The Nextcloud administrator can install the integration app from the in-built application market. To do this, go to the user name and select Apps. After that, find ONLYOFFICE in the list of available applications and install it.
If the server with the Nextcloud installed does not have the Internet access, or if you need it for some other reason, the administrator can install the application manually. To start using ONLYOFFICE Docs with Nextcloud, the following steps must be performed:
-
Go to the Nextcloud server apps/ directory (or some other directory used to connect applications):
cd apps/ -
Get the ONLYOFFICE app for Nextcloud. There are several ways to do that:
- Download the latest signed version from the official store for Nextcloud.
- Download the latest signed version from the application release page on GitHub.
- Clone the application source code and compile it yourself:
git clone https://github.com/ONLYOFFICE/onlyoffice-nextcloud.git onlyofficecd onlyofficegit submodule update --init --recursive -
Build webpack (only if you chose to clone on the previous step):
npm installnpm run build -
Install Composer dependencies (only if you chose to clone on the step 2):
composer install -
Change the owner to update the application right from Nextcloud web interface:
chown -R www-data:www-data onlyoffice -
In Nextcloud, open the ~/settings/apps/disabled page with Not enabled apps by administrator and click Enable for the ONLYOFFICE application.
Configuring ONLYOFFICE app for Nextcloud
In Nextcloud, open the ~/settings/admin/onlyoffice page with administrative settings for ONLYOFFICE section. Enter the following address to connect ONLYOFFICE Docs:
https://<documentserver>/
where the documentserver is the name of the server with the ONLYOFFICE Docs installed. The address must be accessible from both the user's browser and the Nextcloud server. The Nextcloud server address must also be accessible from ONLYOFFICE Docs for correct work. You can register a free ONLYOFFICE Cloud and use its public IP address or public DNS that can be found in the Instances section of the cloud console.
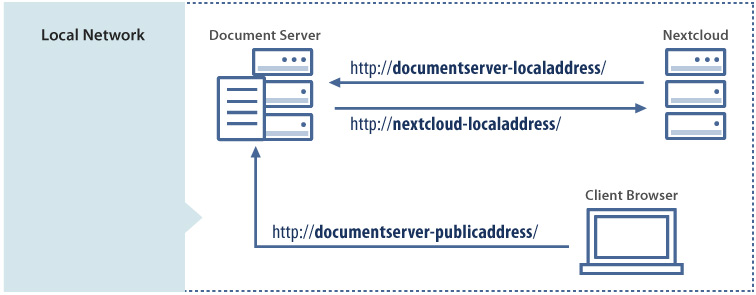
Sometimes your network configuration might not allow the requests between installed Nextcloud and ONLYOFFICE Docs using the public addresses. The Advanced server settings allows to set the ONLYOFFICE Docs address for internal requests from Nextcloud server and the returning Nextcloud address for the internal requests from ONLYOFFICE Docs. You need to enter them in the appropriate fields.
Starting from version 7.2, JWT is enabled by default and the secret key is generated automatically to restrict access to ONLYOFFICE Docs and for security reasons and data integrity. Specify your own Secret key in the Nextcloud administrative configuration. In the ONLYOFFICE Docs config file, specify the same secret key and enable the validation.
Enable or disable the Open file in the same tab setting.
The Open in ONLYOFFICE action will be added to the file context menu. You can specify this action as default and it will be used when the file name is clicked for the selected file types.
ONLYOFFICE Connector for Nextcloud: Configuration Parameters
These are all available configuration parameters for the ONLYOFFICE integration app for Nextcloud. The parameters are grouped into two categories depending on how they can be configured:
- Basic settings: configured via the Nextcloud admin UI or OCC commands.
- Advanced settings: configured only via
config/config.phpfile.
Basic Configuration (UI / OCC)
These settings are available through the Nextcloud admin interface or via occ commands.
| Parameter | Description |
|---|---|
DocumentServerUrl | Public address of ONLYOFFICE Docs server (set via UI or occ). |
Open in same tab | Defines whether documents open in the same browser tab. |
Enable JWT | Enables JWT validation for secure communication. |
Secret key | JWT secret used to sign requests (alternative to jwt_secret in config). |
Advanced server settings | Enables configuration of internal server URLs. |
DocumentServerInternalUrl | Internal address of ONLYOFFICE Docs (used if advanced settings enabled). |
StorageUrl | Internal address of Nextcloud (used if advanced settings enabled). |
def_formats | Defines default file formats. |
editable | Enables editing of certain file types. |
review | Enables review-only mode. |
forcesave | Enables force saving documents to storage. |
customizationChat | Enables or disables chat panel. |
customizationFeedback | Enables feedback and support links. |
customizationHelp | Enables help link. |
customizationToolbarNoTabs | Shows toolbar without tabs. |
customizationCompactHeader | Enables compact header mode. |
customizationToolbarHideSettings | Hides the “Settings” menu in the editor. |
customizationFeedbackSuggestion | Allows users to submit suggestions. |
customizationFeedbackBug | Allows users to report bugs. |
customizationAutosave | Enables autosave mode. |
SameTab | Opens files in the same tab (deprecated UI setting). |
preview | Enables document preview generation. |
about | Shows About section. |
You can also use the occ command-line interface to get/set these parameters:
php occ config:app:set onlyoffice customizationChat --value=false
Advanced Configuration (config/config.php only)
You can define the following parameters in the config/config.php file to customize the behavior of the ONLYOFFICE connector:
| Parameter | Description |
|---|---|
DocumentServerUrl | Public address of the ONLYOFFICE Docs server. |
DocumentServerInternalUrl | Internal address of ONLYOFFICE Docs used for server-to-server communication. |
StorageUrl | Internal address of the Nextcloud server used by ONLYOFFICE Docs. |
jwt_secret | Secret key used to generate and validate JWT tokens. |
jwt_secret_path | Path to a file containing the JWT secret. |
jwt_header | Name of the HTTP header used to send the JWT. Default is Authorization. |
jwt_in_body | If true, the JWT token is sent in the request body instead of the header. |
jwt_disable | If true, disables JWT signature verification. |
jwt_leeway | Leeway in seconds to account for clock skew when validating JWT tokens. |
jwt_expiration | JWT token expiration time in seconds. |
verify_peer_off | If true, disables SSL peer verification for connections. |
limit_thumb_size | Maximum file size in bytes for which thumbnails will be generated. |
disable_download | If true, disables file download functionality. |
editors_check_interval | Interval in minutes for checking availability of ONLYOFFICE Docs. Default is 1440. |
The following parameters must be added manually to the config/config.php file in your Nextcloud installation:
<?php
'onlyoffice' => array (
    'jwt_secret' => 'your_secret_key',
    'jwt_header' => 'Authorization',
)
?>
Checking the connection
You can check the connection to ONLYOFFICE Docs by using the following occ command:
occ onlyoffice:documentserver --check
You will see a text either with information about the successful connection or the cause of the error.
Advanced document permissions
The Advanced tab allows you to grant additional access rights only to those users specified in the Sharing tab without the ability to re-share the file. Depending on the chosen Custom permission option and the file type (docx, pptx, xlsx), you can grant different additional rights.
- If the DOCX file is shared with the Custom permission (Edit enabled, Share disabled) in the Sharing tab, you can set the given rights to only reviewing (Review only) or only commenting (Comment only) in the Advanced tab.
- If the XLSX file is shared with the Custom permission (Edit enabled, Share disabled) in the Sharing tab, you can set the given rights to only commenting (Comment only) or applying filtering for everyone (Global filter, which is enabled by default) in the Advanced tab.
- If the PPTX file is shared with the Custom permission (Edit enabled, Share disabled) in the Sharing tab, you can set the given rights to only commenting (Comment only) in the Advanced tab.
- If the PDF file is shared with the Custom permission (Edit enabled, Share disabled) in the Sharing tab, you can set the given rights to only filling out (Form Filling) in the Advanced tab.
How it works
The ONLYOFFICE integration follows the API documented here.
-
When creating a new file, the user navigates to a document folder within Nextcloud and clicks the Document, Spreadsheet or Presentation item in the new (+) menu.
-
The browser invokes the create method in the /lib/Controller/editorController.php controller. This method adds a copy of a file from the assets folder to the folder the user is currently in.
-
When opening an existing file, the user navigates to it within Nextcloud and selects the Open in ONLYOFFICE menu option.
-
A new browser tab is opened and the index method of the /lib/Controller/editorController.php controller is invoked.
-
The app prepares a JSON object with the following properties:
- url - the URL that ONLYOFFICE Docs uses to download the document;
- callbackUrl - the URL that ONLYOFFICE Docs informs about status of the document editing;
- documentServerUrl - the URL that the client needs to respond to ONLYOFFICE Docs (can be set at the administrative settings page);
- key - the UUID+Modified Timestamp to instruct ONLYOFFICE Docs whether to download the document again or not.
-
Nextcloud takes this object and constructs a page from templates/editor.php template, filling in all of those values so that the client browser can load up the editor.
-
The client browser makes a request to the JavaScript library from ONLYOFFICE Docs and sends ONLYOFFICE Docs the DocEditor configuration with the above properties.
-
Then ONLYOFFICE Docs downloads the document from Nextcloud and the user begins editing.
-
ONLYOFFICE Docs sends a POST request to callbackUrl to inform Nextcloud that a user is editing the document.
-
When all users and client browsers are done with editing, they close the editing window.
-
After 10 seconds of inactivity, ONLYOFFICE Docs sends a POST to callbackUrl letting Nextcloud know that the clients have finished editing the document and closed it.
-
Nextcloud downloads a new version of the document, replacing the old one.
Known issues
-
Connecting external storages. Adding the storage using the External storages app has issues with the co-editing in some cases. If the connection is made using the same authorization keys (the Username and password or Global credentials authentication type is selected), then the co-editing is available for the users. If different authorization keys are used (Log-in credentials, save in database or User entered, store in database authentication options), the co-editing is not available. When the Log-in credentials, save in session authentication type is used, the files cannot be opened in the editor.
-
Validating certificate. If you are using a self-signed certificate for your ONLYOFFICE Docs, Nextcloud will not validate such a certificate and will not allow connection to/from ONLYOFFICE Docs. This issue can be solved in two ways:
- Check the Disable certificate verification (insecure) box on the ONLYOFFICE administration page, Server settings section, within your Nextcloud.
- Change the Nextcloud config file manually. Locate the Nextcloud config file (/nextcloud/config/config.php) and open it. Insert the following section to it:
<?php'onlyoffice' => array ('verify_peer_off' => true)?>This will disable the certificate verification and allow Nextcloud to establish connection with ONLYOFFICE Docs.
notePlease remember that this is a temporary insecure solution and we strongly recommend that you replace the certificate with the one issued by some CA. Once you do that, do not forget to uncheck the corresponding setting box or remove the above section from the Nextcloud config file.
-
Background task. If the editors don't open or save documents after a period of proper functioning, the reason can be a problem in changing network settings or disabling any relevant services, or issues with the SSL certificate.
To solve this, we added an asynchronous background task which runs on the server to check availability of the editors. It allows testing the connection between your Nextcloud instance and ONLYOFFICE Docs, namely availability of server addresses and the validity of the JWT secret are being checked.
If any issue is detected, the ONLYOFFICE app (consequently, the ability to create and open files) will be disabled. As a Nextcloud admin, you will get the corresponding notification.
This option allows you to avoid issues when the server settings become incorrect and require changes.
By default, this background task runs once a day. If necessary, you can change the frequency. To do so, open the Nextcloud config file (_/nextcloud/config/config.php_). Insert the following section and enter the required value in minutes:
<?php"onlyoffice" => array ("editors_check_interval" => 3624)?>To disable this check running, enter 0 value.
-
Federated Cloud Sharing. If the document is shared using the Federated Cloud Sharing app, the co-editing between the Nextcloud instances connected to different ONLYOFFICE servers will not be available. The users from one and the same Document Server can edit the document in the co-editing mode, but the users from two (or more) different Document Servers will not be able to collaborate on the same document in real time.
-
Converting files. ONLYOFFICE Docs uses Office Open XML format as a basis when opening and editing files. If the file format is different from OOXML, it will still be converted to the corresponding OOXML for the ONLYOFFICE Docs proper work and faster performance. After that you can edit the file, making any changes available for the base OOXML format and save the file to this base OOXML format.
In case the source Nextcloud file format was different from the base one, and you still want to save it to the original format, the file will be converted to this format from OOXML. As the formats are fundamentally different, some data (such as charts, tables, autoshapes or images) and formatting can be lost due to the simple reason that some formats (csv, txt, etc.) do not support them or treat them differently than OOXML standard does. That is why all the non-OOXML files by default are opened for viewing only, although there is an option to convert the file in the context menu. If you realise the data/formatting loss risks after the conversion, but still want to open non-OOXML files for editing, you can check them in the list in the settings. Editing for csv and txt files is available by default.
-
When accessing a document without download permission, file printing and using the system clipboard are not available. Copying and pasting within the editor is available via buttons in the editor toolbar and in the context menu.
-
When a file is opened for editing in ONLYOFFICE while being simultaneously edited in other tools, changes may be overwritten or lost. To avoid conflicts and ensure smooth collaboration, we recommend using the Temporary File Lock application: https://apps.nextcloud.com/apps/files_lock. This helps prevent parallel editing and safeguards your work.
Download the ONLYOFFICE app for Nextcloud here.